1
FUN GAMES WITH YOUR FRIENDS / How to Crack DRM Video, Rip a DVD, burn a DVD, backup iPod File and make iPhone
« on: March 30, 2010, 07:32:51 PM »
This article is a full guide which includes five parts, and the following content will show you how to Crack DRM Video, Rip a DVD, burn a DVD, backup iPod File and make iPhone Ringtone.
(1) How to Crack DRM video and audio files.
(2) How to Rip a DVD to put it on iPod/iPhone 3G/PSP/Zune/Sansa View/iRiver……
(3) How to convert and burn WMV/AVI video directly to DVD
(4) How to transfer video/music from iPod to computer.
(5) How to make your own iPhone Ringtone
Part 1: How to crack DRM video and audio files.
Daniusoft Digital Media Converter Pro software is the quickest and easiest solution to remove drm from WMV, M4V, M4P, WMA, M4A, AAC, M4B, AA files by quick recording. You can use this professional tool to crack drm and put them on your iPod/iPhone 3G/PSP/Zune/Sansa View/iRiver……
The process is as follows:
Make preparation: Download Daniusoft Digital Media Converter Pro, install and run it.
Stpe 1: Run the software and click “Add…” button to load WMA or M4A, M4B, AAC, WMV, M4P, M4V, ASF files
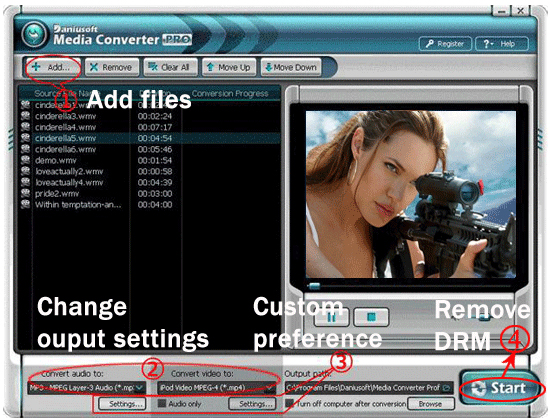
Step 2: Choose output formats. If you want to convert protected audio files, please select “Convert audio to” list; If you want to convert protected video files, please select “Convert video to” list.
Stpe 3: You can click “Settings” button to custom preference for output files.
Click “Settings” button bellow “Convert audio to” list for protected audio files
Click “Settings” button bellow “Convert video to” list for protected video files
Step 4: Start remove DRM and convert your DRM protected music and videos by click on “Start” button.
Part 2: How to rip a DVD to put it on iPod/iPhone 3G/PSP/Zune/Sansa View/iRiver……
With Aiseesoft DVD Ripper you can rip and convert any DVD to most popular videos supported by your iPod, iPhone 3G, PSP, Zune, Sansa Video and other portable devices.
Make preparation: Download Aiseesoft DVD Ripper, install and run it.

Step 1. Click “Load DVD” button to load your DVD.
Step 2: Select the output video format you want from the “Profile” drop-down list.
Step 3: Click the “Start” button to start your conversion and In a short while it will be finished.
Tips:
You can also use the powerful editing funtion (Snapshot, Merge, Effect, Trim, Crop)to edit your DVD.
Part 3: How to convert and burn any video directly to DVD/VCD/SVCD
With Cucusoft DVD/VCD/SVCD Creator Pro you can burn any AVI/WMV videos to DVD.
The process is as follows.
Make preparation: Download Cucusoft DVD/VCD/SVCD Creator Pro, install and run it.
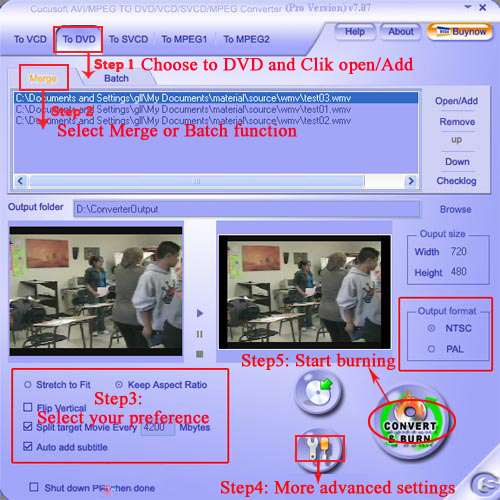
Step 1: Choose the “To DVD” button and click "Opne/Add" button to import WMV/AVI files to convert WMV/AVI to DVD.
Step 2: Select Merge or Batch function.
Batch Function, Support converting multiple files to DVD VCD SVCD MPEG1/2 at the same instance
Merge/Join function, Support selecting several clips from different sources and combine them into one single output
Step 3: Set your preference to burn WMV/AVI to DVD.
Step 4: Click "More Advanced Settings" button to set advanced settings for your files.
Step 5: Choose the “Output Folder” and Click “Convert & Burn” button to start.
Part 4: How to transfer video/music from iPod to computer.
With Aiseesoft iPod to Computer Transfer you can tranfer or backup your videos and songs to your computer.
Make preparation: Download Aiseesoft iPod to Coumputer Transfer, install and run it.
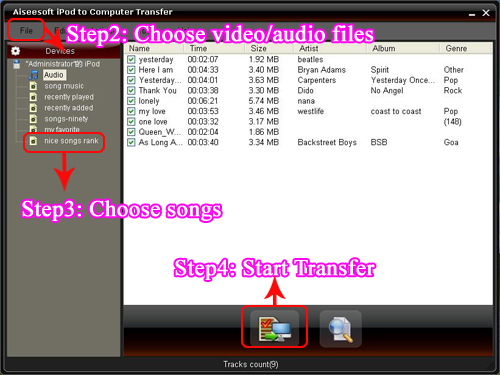
Step 1: When you connect your iPod to the computer via USB cable and run the program, the program will detect and recognise your device automatically.
Step 2: Then from the file list, you can choose the audio or video files that you want to transfer and a detailed list will be displayed at the right for your to choose.
Step 3:Choose the songs you want to transfer and then click the "Start Transfer " button below the list to begin transferring files from iPod to computer.
Step 4: In a short while your conversion will be finished
Part 5: How to make your own iPhone Ringtone
Make preparation: Download and install Tipard iPhone Ringtone Maker
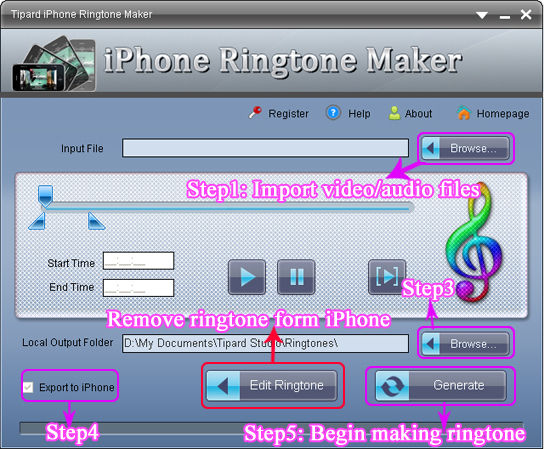
Step 1: Click “Browse…” button on the right side of "Input File" to import the file(audio or video file) that you want to make ringtone from it.
Step 2: Click button to listen the music to find the segment that you want to use it as ringtone.
Then drag and click the start & end slider to set your wanted segment, or type the start & end time in the corresponding text box directly to get the exact segment. Click to pre-listen the converted audio before generate.
Step 3: Click “Browse…” button on the right side of "Local Output Folder" to choose the output destination.
Step 4: Check "Export to iPhone" option, the converted ringtone will be load to your iPhone directly.
Step 5: After all the settings are finished, click “Generate” button to begin making your own iPhone ringtone.
PS:
With this professional tool you can remove your ringtone from your iPhone as you like, and you can also rename your Ringtone at your favor.
Hurry up! Try Now!
(1) How to Crack DRM video and audio files.
(2) How to Rip a DVD to put it on iPod/iPhone 3G/PSP/Zune/Sansa View/iRiver……
(3) How to convert and burn WMV/AVI video directly to DVD
(4) How to transfer video/music from iPod to computer.
(5) How to make your own iPhone Ringtone
Part 1: How to crack DRM video and audio files.
Daniusoft Digital Media Converter Pro software is the quickest and easiest solution to remove drm from WMV, M4V, M4P, WMA, M4A, AAC, M4B, AA files by quick recording. You can use this professional tool to crack drm and put them on your iPod/iPhone 3G/PSP/Zune/Sansa View/iRiver……
The process is as follows:
Make preparation: Download Daniusoft Digital Media Converter Pro, install and run it.
Stpe 1: Run the software and click “Add…” button to load WMA or M4A, M4B, AAC, WMV, M4P, M4V, ASF files
Step 2: Choose output formats. If you want to convert protected audio files, please select “Convert audio to” list; If you want to convert protected video files, please select “Convert video to” list.
Stpe 3: You can click “Settings” button to custom preference for output files.
Click “Settings” button bellow “Convert audio to” list for protected audio files
Click “Settings” button bellow “Convert video to” list for protected video files
Step 4: Start remove DRM and convert your DRM protected music and videos by click on “Start” button.
Part 2: How to rip a DVD to put it on iPod/iPhone 3G/PSP/Zune/Sansa View/iRiver……
With Aiseesoft DVD Ripper you can rip and convert any DVD to most popular videos supported by your iPod, iPhone 3G, PSP, Zune, Sansa Video and other portable devices.
Make preparation: Download Aiseesoft DVD Ripper, install and run it.
Step 1. Click “Load DVD” button to load your DVD.
Step 2: Select the output video format you want from the “Profile” drop-down list.
Step 3: Click the “Start” button to start your conversion and In a short while it will be finished.
Tips:
You can also use the powerful editing funtion (Snapshot, Merge, Effect, Trim, Crop)to edit your DVD.
Part 3: How to convert and burn any video directly to DVD/VCD/SVCD
With Cucusoft DVD/VCD/SVCD Creator Pro you can burn any AVI/WMV videos to DVD.
The process is as follows.
Make preparation: Download Cucusoft DVD/VCD/SVCD Creator Pro, install and run it.
Step 1: Choose the “To DVD” button and click "Opne/Add" button to import WMV/AVI files to convert WMV/AVI to DVD.
Step 2: Select Merge or Batch function.
Batch Function, Support converting multiple files to DVD VCD SVCD MPEG1/2 at the same instance
Merge/Join function, Support selecting several clips from different sources and combine them into one single output
Step 3: Set your preference to burn WMV/AVI to DVD.
Step 4: Click "More Advanced Settings" button to set advanced settings for your files.
Step 5: Choose the “Output Folder” and Click “Convert & Burn” button to start.
Part 4: How to transfer video/music from iPod to computer.
With Aiseesoft iPod to Computer Transfer you can tranfer or backup your videos and songs to your computer.
Make preparation: Download Aiseesoft iPod to Coumputer Transfer, install and run it.
Step 1: When you connect your iPod to the computer via USB cable and run the program, the program will detect and recognise your device automatically.
Step 2: Then from the file list, you can choose the audio or video files that you want to transfer and a detailed list will be displayed at the right for your to choose.
Step 3:Choose the songs you want to transfer and then click the "Start Transfer " button below the list to begin transferring files from iPod to computer.
Step 4: In a short while your conversion will be finished
Part 5: How to make your own iPhone Ringtone
Make preparation: Download and install Tipard iPhone Ringtone Maker
Step 1: Click “Browse…” button on the right side of "Input File" to import the file(audio or video file) that you want to make ringtone from it.
Step 2: Click
button to listen the music to find the segment that you want to use it as ringtone. Then drag and click the start & end slider to set your wanted segment, or type the start & end time in the corresponding text box directly to get the exact segment. Click
to pre-listen the converted audio before generate. Step 3: Click “Browse…” button on the right side of "Local Output Folder" to choose the output destination.
Step 4: Check "Export to iPhone" option, the converted ringtone will be load to your iPhone directly.
Step 5: After all the settings are finished, click “Generate” button to begin making your own iPhone ringtone.
PS:
With this professional tool you can remove your ringtone from your iPhone as you like, and you can also rename your Ringtone at your favor.
Hurry up! Try Now!